Here is the LM338 Adjustable DC power supply circuit, 1.2V to 30V. It can provide a current maximum to 5A and 10A. If you have used LM317 or LM350.
They are similar, so easy to use with a few components. But LM338 has higher a current than LM317. You can look at a datasheet below more spec.

LM338 Datasheet and Pinout
The LM138/LM238/LM338 are adjustable 3-terminal positive voltage regulators capable of supplying in excess of 5A over a 1.2V to 32V output range. They are exceptionally easy to use and require only 2 resistors to set the output voltage. The careful circuit design has resulted in outstanding load and line regulation comparable to many commercial power supplies.
The LM338 or LM138 family is supplied in a standard 3-lead transistor package.
LM338 features
- 7A Maximum output current
- 5A output current
- Adjustable output 1.2V to 37V (Variable Power supply circuit)
- Line regulation typically 0.005% /V
- Line regulation typically 0.1%
- Thermal regulation
- Current limit constant with temperature
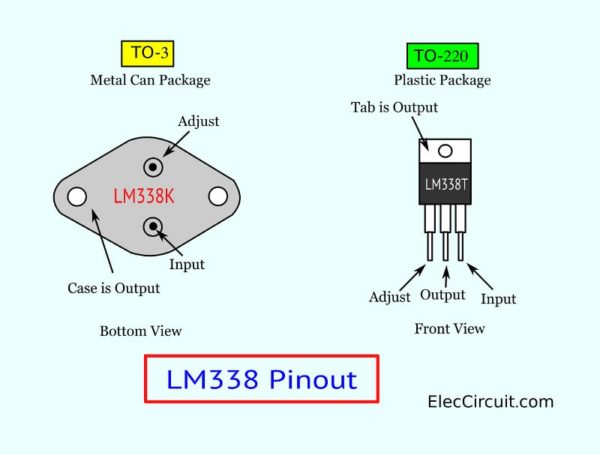
Pinout of LM338K To-03 and LM338T TO-220
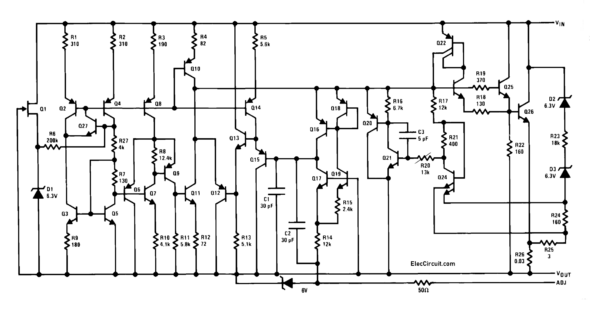
Schematic Diagram
Look at the Schematic Diagram inside LM338.
It has a lot of transistors, Zener diodes, resistors, and capacitors. We cannot learn all about it. But I think we can do it.
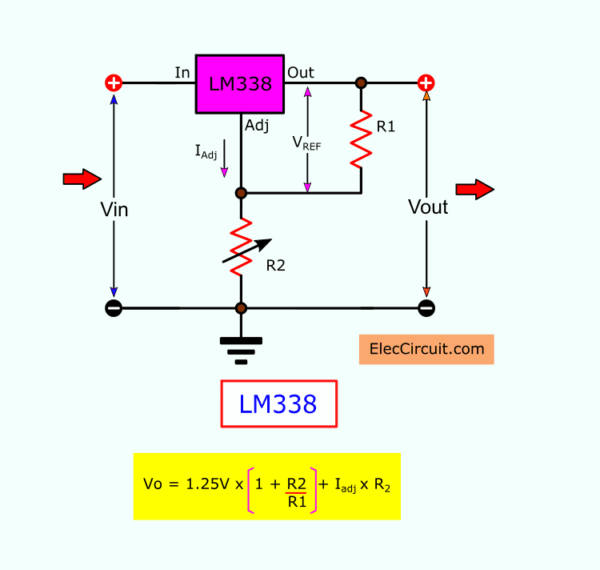
LM338 Basic circuit Voltage Calculator
Look at a basic circuit. We use only 2 resistors can set the constant output voltage.
Vout = 1.25V x {1+R2/R1} + Iadj x R2
Some said Iadj is very low current(approx 50uA only).
So, we may chop them up. It is shorter and easy to calculate.
Vout = 1.25V x {1+R2/R1}
Which is better?
For example:
You use R1 = 270 ohms and R2= 390 ohms. It causes output is 3.06V
You can use this like LM317 or LM350 or MC34063
Is it easy? If you have voltages choice with most resistors. In local stores near you.
Look at the Resistors list (without calculating):
You don’t have a calculator, right or too little time or really slow brain. See below, I have an easy solution. For you (me too) choose the right resistor according to the voltage we need.
1.43V : R1 = 470Ω, R2 = 68Ω
1.47V : R1 = 470Ω, R2 = 82Ω
1.47V : R1 = 390Ω, R2 = 68Ω
1.51V : R1 = 330Ω, R2 = 68Ω
1.51V : R1 = 390Ω, R2 = 82Ω
1.52V : R1 = 470Ω, R2 = 100Ω
1.53V : R1 = 390Ω, R2 = 82Ω
1.56V : R1 = 330Ω, R2 = 82Ω
1.57V : R1 = 270Ω, R2 = 68Ω
1.57V : R1 = 470Ω, R2 = 120Ω
1.57V : R1 = 390Ω, R2 = 100Ω
1.59V : R1 = 390Ω, R2 = 100Ω
1.60V : R1 = 240Ω, R2 = 68Ω
1.63V : R1 = 330Ω, R2 = 100Ω
1.63V : R1 = 270Ω, R2 = 82Ω
1.64V : R1 = 390Ω, R2 = 120Ω
1.64V : R1 = 220Ω, R2 = 68Ω
1.65V : R1 = 470Ω, R2 = 150Ω
1.66V : R1 = 390Ω, R2 = 120Ω
1.68V : R1 = 240Ω, R2 = 82Ω
1.71V : R1 = 330Ω, R2 = 120Ω
1.71V : R1 = 270Ω, R2 = 100Ω
1.72V : R1 = 220Ω, R2 = 82Ω
1.72V : R1 = 180Ω, R2 = 68Ω
1.73V : R1 = 470Ω, R2 = 180Ω
1.73V : R1 = 390Ω, R2 = 150Ω
1.76V : R1 = 390Ω, R2 = 150Ω
1.77V : R1 = 240Ω, R2 = 100Ω
1.81V : R1 = 270Ω, R2 = 120Ω
1.82V : R1 = 150Ω, R2 = 68Ω
1.82V : R1 = 330Ω, R2 = 150Ω
1.82V : R1 = 180Ω, R2 = 82Ω
1.83V : R1 = 390Ω, R2 = 180Ω
1.84V : R1 = 470Ω, R2 = 220Ω
1.86V : R1 = 390Ω, R2 = 180Ω
1.88V : R1 = 240Ω, R2 = 120Ω
1.89V : R1 = 470Ω, R2 = 240Ω
1.93V : R1 = 330Ω, R2 = 180Ω
1.93V : R1 = 150Ω, R2 = 82Ω
1.94V : R1 = 270Ω, R2 = 150Ω
1.96V : R1 = 390Ω, R2 = 220Ω
1.97V : R1 = 470Ω, R2 = 270Ω
1.99V : R1 = 390Ω, R2 = 220Ω
2.02V : R1 = 390Ω, R2 = 240Ω
2.03V : R1 = 240Ω, R2 = 150Ω
2.06V : R1 = 390Ω, R2 = 240Ω
2.08V : R1 = 330Ω, R2 = 220Ω
2.10V : R1 = 220Ω, R2 = 150Ω
2.12V : R1 = 390Ω, R2 = 270Ω
2.13V : R1 = 470Ω, R2 = 330Ω
2.16V : R1 = 330Ω, R2 = 240Ω
2.16V : R1 = 390Ω, R2 = 270Ω
2.19V : R1 = 240Ω, R2 = 180Ω
2.23V : R1 = 470Ω, R2 = 390Ω
2.25V : R1 = 150Ω, R2 = 120Ω
2.27V : R1 = 270Ω, R2 = 220Ω
2.27V : R1 = 330Ω, R2 = 270Ω
2.29V : R1 = 470Ω, R2 = 390Ω
2.29V : R1 = 180Ω, R2 = 150Ω
2.31V : R1 = 390Ω, R2 = 330Ω
2.36V : R1 = 270Ω, R2 = 240Ω
2.37V : R1 = 390Ω, R2 = 330Ω
2.40V : R1 = 240Ω, R2 = 220Ω
2.44V : R1 = 390Ω, R2 = 390Ω
2.50V : R1 = 470Ω, R2 = 470Ω
2.57V : R1 = 390Ω, R2 = 390Ω
2.61V : R1 = 220Ω, R2 = 240Ω
2.65V : R1 = 330Ω, R2 = 390Ω
2.66V : R1 = 240Ω, R2 = 270Ω
2.73V : R1 = 330Ω, R2 = 390Ω
2.74V : R1 = 470Ω, R2 = 560Ω
2.75V : R1 = 150Ω, R2 = 180Ω
2.76V : R1 = 390Ω, R2 = 470Ω
2.78V : R1 = 270Ω, R2 = 330Ω
2.78V : R1 = 220Ω, R2 = 270Ω
2.84V : R1 = 390Ω, R2 = 470Ω
2.92V : R1 = 180Ω, R2 = 240Ω
2.96V : R1 = 270Ω, R2 = 390Ω
2.97V : R1 = 240Ω, R2 = 330Ω
3.03V : R1 = 330Ω, R2 = 470Ω
3.05V : R1 = 390Ω, R2 = 560Ω
3.06V : R1 = 270Ω, R2 = 390Ω
3.06V : R1 = 470Ω, R2 = 680Ω
3.08V : R1 = 150Ω, R2 = 220Ω
3.13V : R1 = 220Ω, R2 = 330Ω
3.14V : R1 = 390Ω, R2 = 560Ω
3.18V : R1 = 240Ω, R2 = 390Ω
3.25V : R1 = 150Ω, R2 = 240Ω
3.28V : R1 = 240Ω, R2 = 390Ω
3.35V : R1 = 220Ω, R2 = 390Ω
3.37V : R1 = 330Ω, R2 = 560Ω
3.43V : R1 = 270Ω, R2 = 470Ω
3.43V : R1 = 390Ω, R2 = 680Ω
3.43V : R1 = 470Ω, R2 = 820Ω
3.47V : R1 = 220Ω, R2 = 390Ω
3.50V : R1 = 150Ω, R2 = 270Ω
3.54V : R1 = 180Ω, R2 = 330Ω
3.55V : R1 = 390Ω, R2 = 680Ω
3.70V : R1 = 240Ω, R2 = 470Ω
3.82V : R1 = 180Ω, R2 = 390Ω
3.83V : R1 = 330Ω, R2 = 680Ω
3.84V : R1 = 270Ω, R2 = 560Ω
3.88V : R1 = 390Ω, R2 = 820Ω
3.91V : R1 = 470Ω, R2 = 1K
3.92V : R1 = 220Ω, R2 = 470Ω
3.96V : R1 = 180Ω, R2 = 390Ω
4.00V : R1 = 150Ω, R2 = 330Ω
4.02V : R1 = 390Ω, R2 = 820Ω
4.17V : R1 = 240Ω, R2 = 560Ω
4.33V : R1 = 150Ω, R2 = 390Ω
4.36V : R1 = 330Ω, R2 = 820Ω
4.40V : R1 = 270Ω, R2 = 680Ω
4.43V : R1 = 220Ω, R2 = 560Ω
4.44V : R1 = 470Ω, R2 = 1.2K
4.46V : R1 = 390Ω, R2 = 1K
4.50V : R1 = 150Ω, R2 = 390Ω
4.51V : R1 = 180Ω, R2 = 470Ω
4.63V : R1 = 390Ω, R2 = 1K
4.79V : R1 = 240Ω, R2 = 680
5.04V : R1 = 330Ω, R2 = 1K
5.05V : R1 = 270Ω, R2 = 820Ω
5.10V : R1 = 390Ω, R2 = 1.2K
5.11V : R1 = 220Ω, R2 = 680Ω
5.14V : R1 = 180Ω, R2 = 560Ω
5.17V : R1 = 150Ω, R2 = 470Ω
5.24V : R1 = 470Ω, R2 = 1.5K
5.30V : R1 = 390Ω, R2 = 1.2K
5.52V : R1 = 240Ω, R2 = 820Ω
5.80V : R1 = 330Ω, R2 = 1.2K
5.88V : R1 = 270Ω, R2 = 1K
5.91V : R1 = 220Ω, R2 = 820Ω
5.92V : R1 = 150Ω, R2 = 560Ω
5.97V : R1 = 180Ω, R2 = 680Ω
6.04V : R1 = 470Ω, R2 = 1.8K
6.06V : R1 = 390Ω, R2 = 1.5K
6.32V : R1 = 390Ω, R2 = 1.5K
6.46V : R1 = 240Ω, R2 = 1K
6.81V : R1 = 270Ω, R2 = 1.2K
6.92V : R1 = 150Ω, R2 = 680Ω
6.93V : R1 = 330Ω, R2 = 1.5K
6.94V : R1 = 180Ω, R2 = 820Ω
7.02V : R1 = 390Ω, R2 = 1.8K
7.10V : R1 = 470Ω, R2 = 2.2K
7.33V : R1 = 390Ω, R2 = 1.8K
7.50V : R1 = 240Ω, R2 = 1.2K
8.07V : R1 = 330Ω, R2 = 1.8K
8.08V : R1 = 150Ω, R2 = 820Ω
8.19V : R1 = 270Ω, R2 = 1.5K
8.30V : R1 = 390Ω, R2 = 2.2K
8.43V : R1 = 470Ω, R2 = 2.7K
8.68V : R1 = 390Ω, R2 = 2.2K
9.06V : R1 = 240Ω, R2 = 1.5K
9.58V : R1 = 330Ω, R2 = 2.2K
9.77V : R1 = 220Ω, R2 = 1.5K
9.90V : R1 = 390Ω, R2 = 2.7K
10.03V : R1 = 470Ω, R2 = 3.3K
10.37V : R1 = 390Ω, R2 = 2.7K
10.63V : R1 = 240Ω, R2 = 1.8K
11.25V : R1 = 150Ω, R2 = 1.2K
11.44V : R1 = 270Ω, R2 = 2.2K
11.48V : R1 = 330Ω, R2 = 2.7K
11.67V : R1 = 180Ω, R2 = 1.5K
11.83V : R1 = 390Ω, R2 = 3.3K
12.40V : R1 = 390Ω, R2 = 3.3K
12.71V : R1 = 240Ω, R2 = 2.2K
13.75V : R1 = 330Ω, R2 = 3.3K
15.31V : R1 = 240Ω, R2 = 2.7K
16.25V : R1 = 150Ω, R2 = 1.8K
16.53V : R1 = 270Ω, R2 = 3.3K
16.59V : R1 = 220Ω, R2 = 2.7K
18.44V : R1 = 240Ω, R2 = 3.3K
19.58V : R1 = 150Ω, R2 = 2.2K
20.00V : R1 = 220Ω, R2 = 3.3K
23.75V : R1 = 150Ω, R2 = 2.7K
24.17V : R1 = 180Ω, R2 = 3.3K
28.75V : R1 = 150Ω, R2 = 3.3K
Table R1 and R2
| R2\R1 | 150Ω | 180Ω | 220Ω | 240Ω | 270Ω | 330Ω | 370Ω | 390Ω | 470Ω |
| 68Ω | 1.82V | 1.72V | 1.64V | 1.60V | 1.56V | 1.51V | 1.48V | 1.47V | 1.43V |
| 82Ω | 1.93V | 1.82V | 1.72V | 1.68V | 1.63V | 1.56V | 1.53V | 1.51V | 1.47V |
| 100Ω | 2.08V | 1.94V | 1.82V | 1.77V | 1.71V | 1.63V | 1.59V | 1.57V | 1.52V |
| 120Ω | 2.25V | 2.08V | 1.93V | 1.88V | 1.81V | 1.70V | 1.66V | 1.63V | 1.57V |
| 150Ω | 2.50V | 2.29V | 2.10V | 2.03V | 1.94V | 1.82V | 1.76V | 1.73V | 1.65V |
| 180Ω | 2.75V | 2.50V | 2.27V | 2.19V | 2.08V | 1.93V | 1.86V | 1.83V | 1.73V |
| 220Ω | 3.08V | 2.78V | 2.50V | 2.40V | 2.27V | 2.08V | 1.99V | 1.96V | 1.84V |
| 240Ω | 3.25V | 2.92V | 2.61V | 2.50V | 2.36V | 2.16V | 2.06V | 2.02V | 1.89V |
| 270Ω | 3.50V | 3.13V | 2.78V | 2.66V | 2.50V | 2.27V | 2.16V | 2.12V | 1.97V |
| 330Ω | 4.00V | 3.54V | 3.13V | 2.97V | 2.78V | 2.50V | 2.36V | 2.31V | 2.13V |
| 370Ω | 4.33V | 3.82V | 3.35V | 3.18V | 2.96V | 2.65V | 2.50V | 2.44V | 2.23V |
| 390Ω | 4.50V | 3.96V | 3.47V | 3.28V | 3.06V | 2.73V | 2.57V | 2.50V | 2.29V |
| 470Ω | 5.17V | 4.51V | 3.92V | 3.70V | 3.43V | 3.03V | 2.84V | 2.76V | 2.50V |
| 560Ω | 5.92V | 5.14V | 4.43V | 4.17V | 3.84V | 3.37V | 3.14V | 3.04V | 2.74V |
| 680Ω | 6.92V | 5.97V | 5.11V | 4.79V | 4.40V | 3.83V | 3.55V | 3.43V | 3.06V |
| 820Ω | 8.08V | 6.94V | 5.91V | 5.52V | 5.05V | 4.36V | 4.02 V | 3.88V | 3.43V |
| 1kΩ | 9.58V | 8.19V | 6.93V | 6.46V | 5.88V | 5.04V | 4.63V | 4.46V | 3.91V |
| 1.2kΩ | 11.25V | 9.58V | 8.07V | 7.50V | 6.81V | 5.80V | 5.30V | 5.10V | 4.44V |
| 1.5kΩ | 13.75V | 11.67V | 9.77V | 9.06V | 8.19V | 6.93V | 6.32V | 6.06V | 5.24V |
| 1.8kΩ | 16.25V | 13.75V | 11.48V | 10.63V | 9.58V | 8.07V | 7.33V | 7.02V | 6.04V |
| 2.2kΩ | 19.58V | 16.53V | 13.75V | 12.71V | 11.44V | 9.58V | 8.68V | 8.30V | 7.10V |
| 2.7kΩ | 23.75V | 20.00V | 16.59V | 15.31V | 13.75V | 11.48V | 10.37V | 9.90V | 8.43V |
| 3.3kΩ | 28.75V | 24.17V | 20.00V | 18.44V | 16.53V | 13.75V | 12.40V | 11.83V | 10.03V |
For example, you need 20V 5A power supply. You look at 20.00V : R1 = 220Ω, R2 = 3.3K.
Protection Diodes
You do not want to see this IC damage, right? As it is expensive. Read now to keep it is healthy.
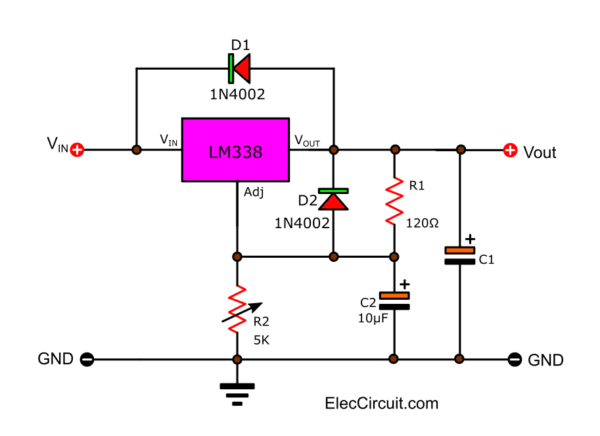
In the circuit diagram above. We use the external capacitors with any IC regulator. Sometimes, we need to add the protection diodes to prevent low current parts in the regulator.
When these capacitors(like 20uF) discharge. It will have low enough internal series resistance to deliver 20A spikes when shorted. Although this surge is short. But it has enough energy to
damage parts of the IC.
Look at n the circuit diagram.
We connect the output capacitor(C1) to the regulator. Then, the input shorts. Next, the output capacitor will discharge into the output of the regulator.
We use D1, D2 1N4002 to absorb this current spike to protect the regulator circuits. The discharge current depends on 3 factors.
- Value of the capacitor
- The output voltage of the regulator
- The rate of decrease of VIN.
In the LM138. this discharge path is through a large junction. It can tolerate a 25A surge with no problem.
This is not true of other types of positive regulators.
Note: For output capacitors of 100 uF or less at the output of 15V or less, there is no need to use diodes. The bypass capacitor(C2) on the adjustment terminal can dis-
charge through a low current junction.
The Discharge occurs when either the input or output is shorted. Internal to the LM138 is a 50X resistor. which limits the peak discharge current.
No protection is needed for output voltages of 25V or less and 10uF capacitance.
So, In-the circuit shows an LM138 with protection diodes included for use with outputs greater than 25V and high values of output capacitance.
It is easy, right?
1.25V to 30V, 5A Variable power supply using LM338
We may have many ways such as: to modify the LM317 Variable Regulator 0-30V 1A. By adding the power transistor MJ2955 in a circuit. As following Adjustable Voltage and current regulator IC power supply .
Or You may build the Variable DC regulator 0-30V 5A circuit, as well. But these methods. Rather cumbersome and wasting too much money.
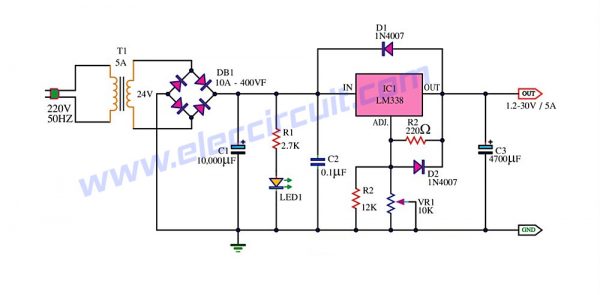
However, we can build this circuit easily and cheaply, By using the packages IC No. LM338 only one, Similar to the LM317 IC number, but it can supply up to 5A, like the circuit shown in Fig.
How this circuit works
The transformer T1 converts the AC 220V to 24 Vac, so be rectified the current by the bridge diode rectifier BD1 – 10A 400V. Until DCV has come out that the filter capacitor C1 is equal to 35 volts.
The IC1 is the heart of the operation of this circuit. By the voltage output value obtained from the IC depends on the voltage value at the Adj pin of IC1, or can be varied by adjusting the VR1.
However, the output voltage will be approximately equal to 1.25+1.25VR1/R1
The output voltage at the output pin of the IC1 is a more powerful filter with the capacitor C3.
Want more brilliant ideas? Here’s how to get them through electronic circuits.
Parts you will need
IC1: LM338K, LM338P Buy it here
D1: Bridge Diode 10A
D2, D3: 1N4007, 1000V 1A diode
R1: 220Ω 0.5W resistors 5%
R2: 12K 0.5W Resistors 5%
VR1: 10K Potentiometer
C1,C3: 4700uF 50V Electrolytic
C2: 0.1uF 50V
LED 5mm
T1: Transformer, 24V 5A secondary
Note: There are affiliate links on this post. This does not change the cost of the item for you. Thanks for your support.
The Building
You must solder all devices in the PCB to completely, for the IC LM338K should install with a large heat sink. and all device has the poles. Caution connected the correct, especially electrolytic capacitor.
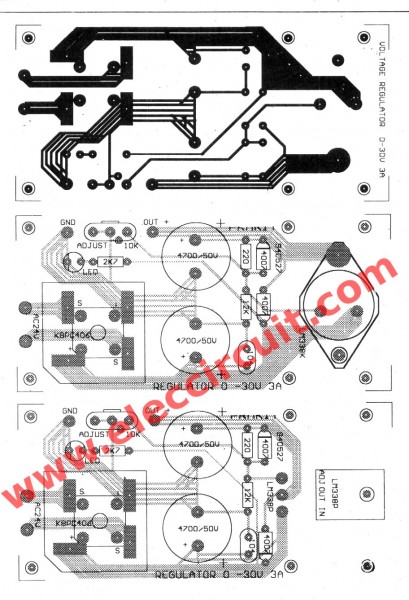
Figure 2 The PCB layout and components layout
NOTE:
Because IC number is high price.You may use the LM317 and transistor, to expand the current demand.
Click HERE >>> Best DC power supply 3Amp to adjust 1.2V-20V & 3V-6V-9V-12V add transistor 2N3055 parallel from 3A to 5A easily.
1-20V, 10A Adjustable DC Power Supply
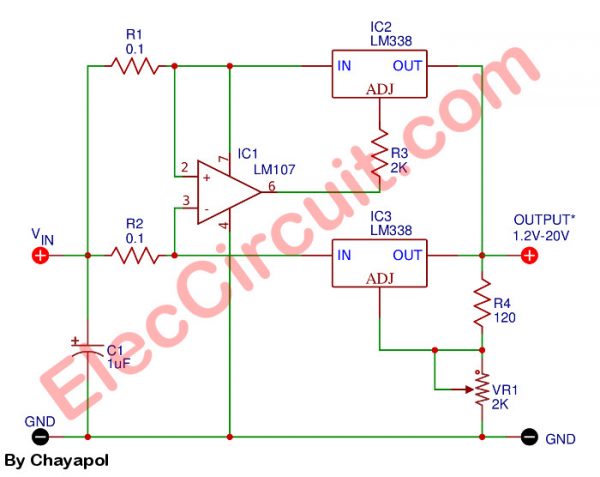
1.2V-20V 10A adjustable DC power supply using LM338
If you want Variable Regulated Power Supply with high current of more than 10A up. I would recommend this circuit. Because build easy, use LM338 and LM107 again.
The normal LM338 has a current of about 5A. Then, must use 2 pcs. It causes more current up to 10A.
The VR1 adjusts an output voltage of 1.2V to 20V to cover the usual usability. This idea can protect all errors with two LM338.
Akom said to me ” For 1-20V, 10A Adjustable DC Power Supply circuit
can you tell me what is the wattage of the 2 resistor R1, R2, R3 and R4 ?”
First of all, let me tell you honestly that I have never built this circuit, but I would like to express my opinion from experience.
R3, and R4 are resistors with relatively low current flowing through them. So we can choose the size of 0.25W to 0.5W comfortably. As for R1, and R2, they have relatively high currents flowing through them. So choosing their wattage size should be considered carefully. According to the principle of P = I x R
where I is the current flowing through each resistor, which is 5A, and R is its resistance, 0.1 ohms.
P = (5×5) x 0.1 = 2.5W, so we use a wattage size of about 5W.
In summary,
R1, R2: 0.1ohms 5W
R3: 2K 0.5W , R4: 120 ohms 0.5W
See other LM338 circuits
I want you to get the most out. The LM338 is very usable. Because we can use it in many circuits as follows. Of course, we would like to focus on simple circuits as the main.
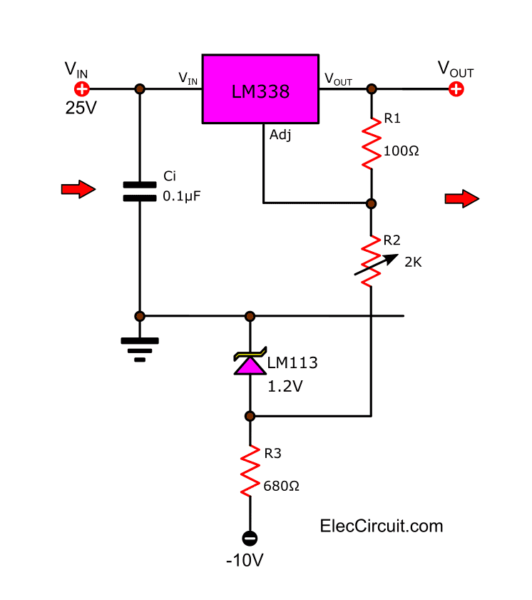
0 to 22V Adjustable voltage regulator
How to start the output voltage at “zero”. In normal it will begin at 1.2V.
But we can use other negative voltage to offset this voltage to zero.
We use the LM113 Zener regulator IC, 1.2V.
Recommended: 0-60V dual regulator using LM317 and LM337
Precision Current Limiter
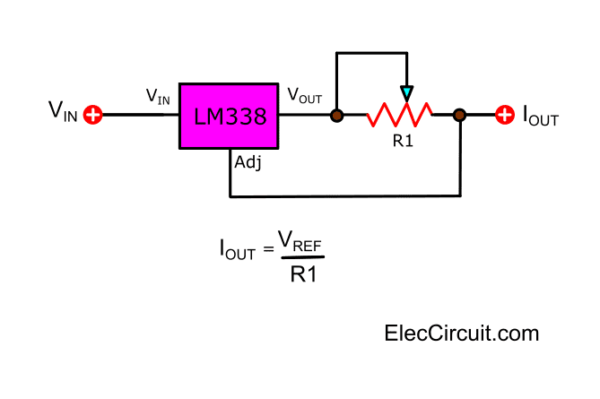
This is a simple constant current regulator. It will limit the output current by adjusting R1.
Iout = Vref / R1
5A current Regulator circuit
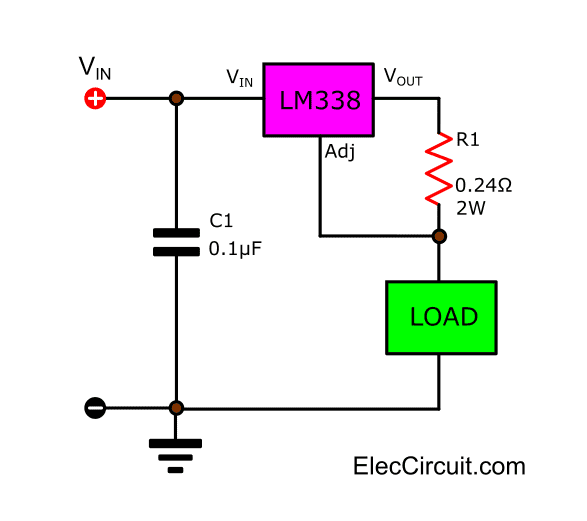
The current will get a constant current of 5A. We use only one resistor to control the output current.
The output current = Vref / R1.
R1 = 0.24 ohms at 2 watts.
We need to use the right power of Resistor, too.
Adjustable Current Regulator circuit
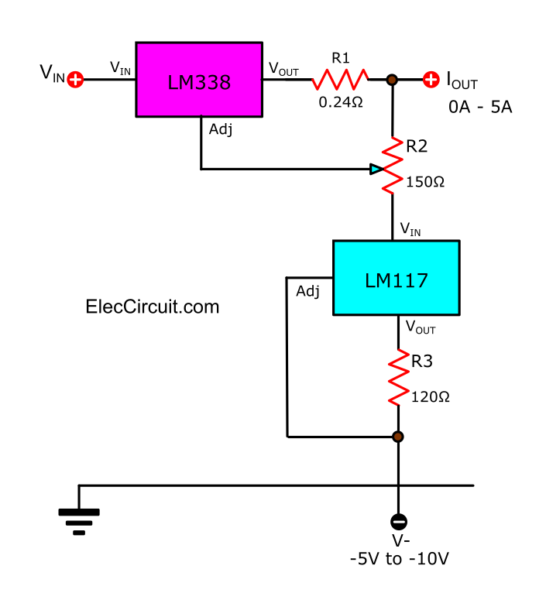
If you want to adjust the output current. We adjust R2 to set the current from 0A to 5A.
This circuit uses LM117 to set the current at Adj of LM338.
Check out these related articles, too:0-50V 3A power supply
If you want to see examples of projects. Using LM338 to multiple connections in parallel. To boost the higher current.
Learn next: 0-30V 20A High current power supply
GET UPDATE VIA EMAIL
I always try to make Electronics Learning Easy.

Dear friend before publishing any circuit you should review,still thanks for sending circuit
you can see my circuits 3d sound which have been patented in 3 countries international application no PCT/US2011/000854. by the way how may r2s you are using, and what is the connection with r1 which is powering led with regulation that is all
i will say copy with sense. Thanks
Dear sir
ref- adj power supply using LM338 1.2 to 30 v
I tried this circuit and i could make a variable voltage only with 1k VR1 variable and not the 10 k , with this the voltage is from 1.5 to 24 volts. But the problem is there is no current at all!!. Please help
Using 10k makes voltage from 24 to 27v only.
Ill try this circuit to heat my model airplane engine´s glow plug. However, since I will use 12 VDC battery instead of AC,I imagine don´t need neither big capacitance filter condenser nor the 1N4007.Will experiment, anyway Thanks a lot and will let you know if I could fly or remained grounded.
what does D2 do?
Dear all,
if you insist on building that 1.2V-30V / 5A using the same circuit diagram as mentionned above , you would not really get it adjusted up to 30V , instead you will all get it adjusted from 1.2V – about 8V & that’s all you’ll get! If you really want to have it adjusted from 1.2V -30V , you’ll simply have to remove the R2 -12K resistor & replace it by a 10microfarad 50V electrolytic capacitor & place a 100nF ceramic capacitor in parallel with that 10microfarad 50V electrolytic capacitor that’s it.
this circuit works ok as long as you use a good quality lm338 and keep the input/output voltage differance less than 40 volts
dear sir…….
please can any one tell me how can i make 30v 10A adjustable power supply using lm338 , and can it be possible with pwm…………
thank you ………
Off course you can convert lm338 which is sim 2 lm317 which has been adapted to emulate an SMPS in many columns. You can try home- circuits.c for guidance. Briefly The ckt is basically a linear unit, but input v is fed thru a res of about 10-22 Ohms which is sampled by an external pwr Tr (I would recommend a Pnp Darlington like TIP147 whose collector is ‘connected’ to gnd via a BA159 Hi speed diode. After which it goes thru a sturdy inductor( about 150-300uh >2/3A) before terminating on an opt cap of about 470uf in the opt also in parallel with .1uf-.33uf (same also at input with both of these mounted as close as poss to the relevant points in the ckt. It is not 2 diff 2 visualise it’s working. The Ic (u may use any fixed or variable linear pwr Ic here) operates normally whose series current is sampled by the ext Tr which also turns ‘on’ @ the same time, once this v reached the opt cap, the Ic “realises” that the voltage is more than it should have been, so it turns off resulting in the s/w off of the ext Tr as well. Once the req V goes low, the Ic turns on again, and the whole cycle repeats agn n agn of course at a very fast freq. The dramatic diff in heating at a load of about 3A in lin mode as well as in SMPS mode is very evident. Anyone can build these versatile ckts easily provided you follow all the “compulsary” rules like respecting the tolerances that are expected compared to the voltages,& current needed as well as keeping all cnnx,s short& clean along with the respective polarities, you will have no other problems. Pt 2b noted is the various waveforms that are there at diff points in the ckt. You will find lovely Sine waves, noisy waveforms as well as a very quiet W/f @ the opt as well. As there is no provision for sending ckts, photos & W/f here, you must forgive me. Happy building and have a nice day 4m Mangalore India.
dear Sir, can anyone put me through on how to construct a 19v 3.5A regulated DC power supply using solar panel as input for the project. thanks
hi friends,
Can anyone please tell me the voltages of the capacitors (filters) and wattage of the resisters given in the above circuit diagram..
I want to develop 12v 5A, 12v 10A with 4,8,16 outputs. Can you please help?
hi,
can any one help me.what is the “value or number” of bridge rectifier in this circuit…
hiiiii
can any one help me how to convert 12v,5A dc 10.5v 5A dc or 10v5A
This is a high quality bench power supply with adjustable output voltage from 0 to 30V and adjustable output current from few miliamperes to 4 amperes. Built-in electronic output current limiter that effectively controls the output current makes this power supply indispensable in the experimenters laboratory as it is possible to limit the current to the typical maximum that a circuit under test may require, and power it up then, without any fear that it may be damaged if something goes wrong. There is also a visual indication that the current limiter is in operation so that you can see at a glance that your circuit is exceeding or not its preset limits.
I’m Married!,
I see only one adjustable potentiometer in the circuit. Where would you place the second to control the current, as you say, and what other components would be needed to complete a power supply that is capable of the separate regulation of both voltage and current output, such as you described in your comment above? Adding a meter for each, also, would be particularly useful, wouldn’t you agree? ;~)
can you tell me what is the wattage of the resistors used. thanks
hi can any one tell me how to convert 5v to 30v/2A??
hi friends does it really works..
Hi , can you tell me what is tha wattage of the 2 resistor R1 & R2 ?
Hi,
You can use 0.5W resistor for R1, R2.
Hello, what is the maximum voltage that can be supplied to the “1-20V, 10A Adjustable DC Power Supply using LM338”? and can lm107 be replaced by lm741?
Hi, Mike
You can choose the project very well. In the future, I want to try it too.
I would like to suggest as follows
View circuits:https://www.eleccircuit.com/high-power-supply-regulater-0-30v-20a-by-lm338/ It uses uA741 or LM741. This circuit can also be used.
Glad you learned new things. Good health
P.S. If there are any results Please don’t forget to share us too.
What will be the output current if the input is 14v 500mA?
Hi Kishok,
Thanks your question.
Thanks your question. How are you?
I like LM338. It is linear regulator IC, 5A output.
But if you use 14V 500mA. I think the output is under 0.5A max.
It is lost in the LM338.
If you have other question. I like to talk with you. Please do not wait. Tell me again.
Thanks
Apichet
Also can I use LM338K?
Hello Kishok,
Yes, You can use it.
some of these circuits are theoretical, some can “damage the regulator” … for example you can not apply more than 25vdc between input and output output of regulator and have load of 1ampere… LM338 maxipun power it is aprox 20-25watts. non-connoisseurs believe that the LM338 can regulate for example from 0 to 30 volts and 5 amperes whit the same input value of voltage.
I clarify, you can regulate Vin=36vdc Vout=30vdc at 5 amps . but if you have Vin=36vdc Vout=5 vdc at 5A the regulator can be damaged. Will be Vin=10vdc Volt=5vdc at 5 amperes. ( never P >30watss P=VI P = (Vin-Vout) * 5A )
Hello Victor Hugo,
Thanks for your visit. Oh…You are a great man.
Hello Victor Hugo,
Thanks for your visit. Oh…You are a great man.
You are an expert, so much about LM338. Your message. Make me and my friends Understand more.
Thanks a lot again.
Apichet
Hello , Thanks fot this Blog. I recommend always using the Texas Insttruments or National brands for these projects. Unfortunately, in some countries we get Chinese regulators which when asking for more than 1 Ampreere and burn. Money and money are los
Hello VICTOR HUGO VARGAS LOPEZ,
Thanks for your visit. And I will use both bands of IC. They are great ICs. I like them.
Did you use LM338?
Thanks
Apichet
Yes , Sir , I used some LM338 , the Vi (dc) is : 9 vdc , 1 capacitor 6800Mf 400v in parallel . I try otutput of 5vdc whit a load of 1 ampere adjunsting a reostat . 0.1 to 0.9 amperes it is regulated ok , but when rises 1 amperes the IC burns
( the LM338 has a big heat sink disipator ) . I had burns 6 IC.
Thansk for your interest…
Oh, In normal LM338 can power up to 5A. Why is lower than this?
I never use LM338. But I use LM350T on Motorola Bands. It is great the current to 3A full.
I bought them for long time ago.
Sometimes You may buy LM338 at Amazon on USA. or Ebay.
I hope your project finished full power.
Thanks again.
Apichet
Oh Sir Apichet … In the project that I metioned I used Chinesse IC because in my country is very dififcult to have National Sem o Texas..they can cost 12USD. The others cost 3USD..
Dear VICTOR
Thanks for your information. It is useful for other people.
Thanks
Apichet
If you allow me, I want to complement something of what I said before … in fact for fine regulators such as the National or Texas or Morola the data sheet does not indicate the power because they are designed and they sense their voltages and currents at the output and they are auto power off. For this reason, I estimate that even so, an output of 30vdc at 5 A (P0VxI 30 * 50 = 150watss with a Vi of 40vdc) cannot be asked (what they can give is Vout 30vdc with 5amps and a Vin of 35vdc) that They would give them to us, they turn off but they are not damaged. On the other hand, the Chinese do not pay themselves … they burn …
Please tell me what PSU is?
Hello Stevor,
Thanks for your visit. I like your question.
Let me explain it to you.
The PSU stands for the power supply unit.
It converts the power provided from the outlet into usable power for the many parts inside various electronics circuits.
Please see here: https://www.eleccircuit.com/what-switching-power-supply-how-does-it-work/
If I don’t understand you well enough Please tell me your doubts.
Or if there are other opinions Well, please advise more.
Thanks
Apichet
I still don’t get the 5A power source which is copied right out of the datasheet.
But 1.25 V squared divided by 0.24 Ohms is still 6.5W and not 2W.
The suggested resistor will smoke. 10W recommended.
Hello Exxxxxxx bxxxxxx,
Thanks for your visit. I am happy that you are interested in LM338.
Yes, If you want 5A of load. We use 0.24 ohms at 10W up. You are correct.
Thanks
Apichet.
PS, I hope you share your test circuit again. I like you to read your story.
hola todo esto esta muy bien pero no he encontrado aun ,niguna pcb con las medidas de impresion ,hay alguna solucion saludos
Hello Apichet,
For 1-20V, 10A Adjustable DC Power Supply circuit
can you tell me what is tha wattage of the 2 resistor R1, R2, R3 and R4 ?
Thanks.
Hello Akom,
Thanks for your question, please read the article, I just added some more thoughts.
Przeczytałem komentarze ale nikt nie wspomniał gdy ktoś zrobi zwarcie na wyjściu przy nastawionym 30V i 5A.
Jak odbywa się płynna regulacja prądu (nie ma żadnego potencjometru)