I am going to show you how to use a phototransistor circuit is simple. To make it a light controller switch or relay with basic components like a transistor, IC, and more. Imagine when The Sunlight then the Relay Switch on to load as a fan runs. we are happy.
Then sundown. the relay switch turns off and no wind to us. Is it easy? It can also be used to detect a light beam, headlights, etc.

Light Actuated Relay Circuit using PhotoTransistor
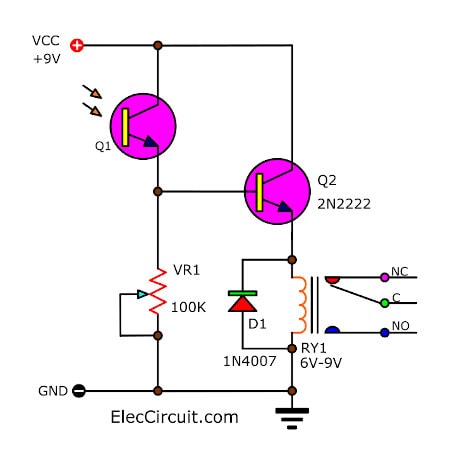
See below it is the Light Actuated Relay Circuit for controlling Electrical appliances by the light. The prominent point of this circuit be meet the light has faster than using the LDR control circuit. When the light leaves work suddenly. When meet the light makes Photo Transistor work bias current change it has made the transistor works to cause Relay work with.

The VR1 perform fine decorate the rapidity of the circuit. This circuit is the circuit is simple. The equipment that use to replace such as Q1 = 2N2222 use other numbers can replace almost be finished request a kind NPN alike enough such as BC549 or BC337 or C1815 or C945 etc.
For oval should use 6V-9V sizes that are valuable the resistance within relay coil about 500ohm. Other detail has a little and build easily. What is more? learn the second circuit.
Read first for beginners: How do transistor circuits work
Simple phototransistor light controller circuit
This is Simple light controller circuit that is controlled light-activate. Which use the inverter gate IC-40106 as main components in compare and controlled switches, and common phototransistors as sensors
The Operation of switch has several forms. The most basic way is to press the switch directly. If modern must be controlling by Infrared light or remote control.
As well as uses radio frequency to control turn on / off switch. Even common light so can control turning on / off switch.

Mini switch controlled with light using CD40106
The working principle
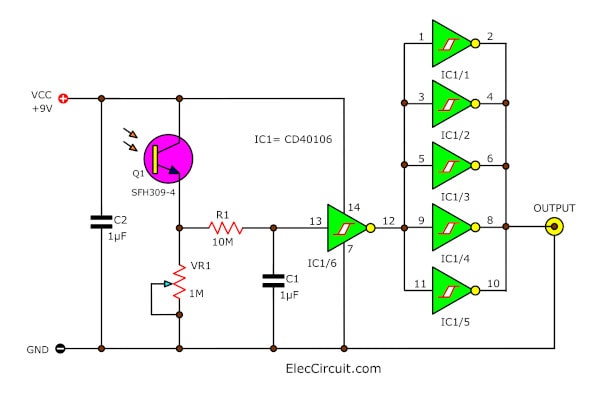
The circuit in Figure 1 is the mini switch controlled with light which use phototransistor as a light receiver there are a schmitt trigger IC(CD40106) as drive an output current to load or the external circuit.
It can provide output current up to 25 milliamperes are circuit that use a few together components, Can be directly connected to small loads. or to drive the relay or an optocoupler type. to drive the load that use with AC volts or also DC high voltage.
The working of circuit when has light to the phototransistor-Q1 cause has current flow between collector-emitter junction, and has voltage drop across a potentiometer-VR1 as voltage “high” to trigger to a first schmitt trigger-IC1/6 until output is “low”. And have others five schmitt triggers that parallel into the inverter gate provide voltage output is “high”. The connecting in parallel to the maximum drive current or the about 25 mA.
The resistor-R1 and capacitor-C1 are connected into the RC networks to prevent noise, which may be inserted. If the problem of noise. may add capacitance-C1 little up. The potentiometer-VR1 to adjust a sensitivity in as switch of Q1. When has a lot light to it. The circuit can be used with the power supply up to 16 V
How to build
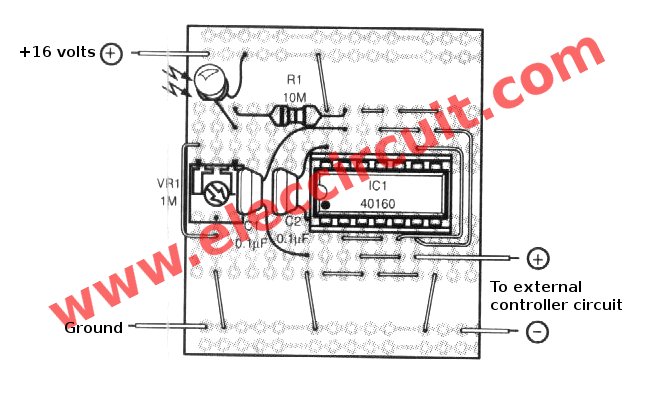
This project is not used a few components so can assemble on the universal PCB board as Figure 2.
In the assembly circuit,Starting equipment lowest first to Beautiful and easy to the assembly. Start from Diode and then resistors and sort of high continuously.

the components layout of this projects
For the device has various polarity should be careful in the assembly circuit. Before placing these components will must set the polarity at PCB and the part match together because If you put backward, may cause equipment or circuit damage.
The components list
Resistors size ¼ W +5%
R1: 10M
VR1: 1M Potentiometer
Capacitors
C1, C2: 0.1uF 50V, Polyester capacitors
Semiconductor
Q1: SFH309-6 Photo transistors
IC1: CD40106__CMOS Hex Schmitt Triggers
Others
Universal PCB board
GET UPDATE VIA EMAIL
I always try to make Electronics Learning Easy.

Hi.
First of all thanks for your great works. I’m so appreciated of all your attempts in this marvelous website.
Second of all! I’ve made this circuit. It triggers the relay when light exposes to the LDR. But when it get’s dark, the relay still triggered. What differences should i do to deactivate relay when my LDR scenes darkness again?
thankyou for the circuit. I would like to know to know what is the importance of C1 and C2. since i not using a bjt but i am using a mosfet to drive my actuator. while i use the mosfet still i require a capacitor between gate and the ground of the MOSFET.
I am attaching my circuit diagram here kindly help me with the changes on the circuit diagram.
can u tell how did u select the particular potentiometer.
Can any one help to as to how to select the potentiometer of correct rating.
I have 22,3 V (max) of supply from solar panel which is connected to zener diode circuit with parallel resistor of 1 k ohm to zener diode (3.0V) and parallel to zener diode is another resistor of 820 ohm which is connected to the photo transistor (BPX38-3 OSO) with Vce = 50 V, Vbe= 7 V maximum values. Between the ground and the emmitter of the photo transistor i have to connect the potentiometer which control the sensitivity of my photo Transistor to supply voltage to the gate terminal of MOSFET with Vgs= 16 V and Vds = 100 V which is connected to the actuator which is to be controlled with the phototransistor.
Hello Paresh Chauhan,
Thanks for your visit. The project is very interesting. Because the Phototransistor has high sensitivity and uses low current. You may use a potentiometer of about 250K to 1M.
It is a good idea. When using MOSFETs. It has a high input impedance. I believe your project will be a success.