If we want to be a producer, This circuit would be a good starting point to composed music for 1000 tracks. With these Sound effect generator circuits may help you. Using basic parts and cheap makes you easy to build or try it.
There are five circuits. You may make the animal sound by electronics circuit such as Donkey,
Let’s get to read and learn more.
555 Sound effect generator circuit
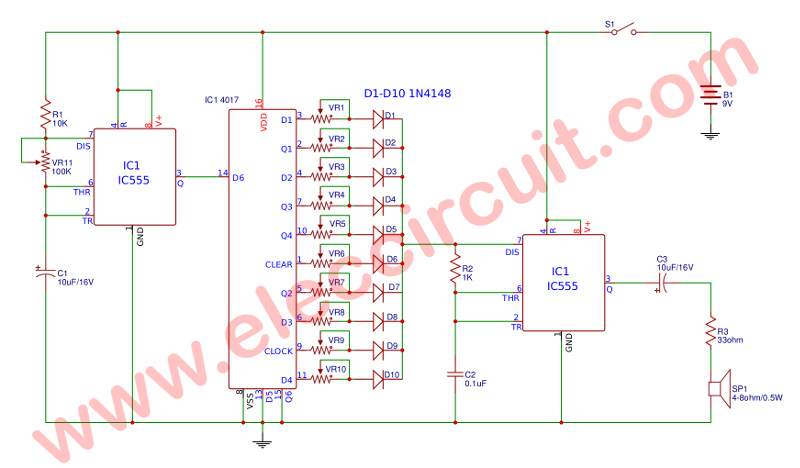
As Figure 1 is a common circuit. Which will see them always when use LED running. We will use an IC-555 timer and IC-4017 Decade Counter Divider with 10 Decoded as sound effect generator with adjusting tone music with a tempo slow – fast as you want it to VR11. And VR1-VR10 to adjust the tone according to need more than 1000 tone.
Figure 1 is the simple sound effect generator circuit using IC-555 and IC-4017
This circuit can be used as various alarms. We will see that use a lot of variable resistors or potentiometers. But it’s better than using a fixed value resistor then got bored listening to only 2-3 times.
The value of VR1-VR10 will use no more than 100K. Because if more than this will cause IC3 to generate the frequency is lower than 100Hz which we will listen to don’t like music.
Learn: How to use 555 timer circuits
555 Sound effect Metronome circuit
We have many ways to build a metronome circuit. First, using transistor so easy way and cheaper.
But now I try IC-555 timer. It also easy and drive a speaker directly. Even can emit two sound effect metronome.
It is hard that I tell you. Sometimes you have to build it with yourself.
How it works
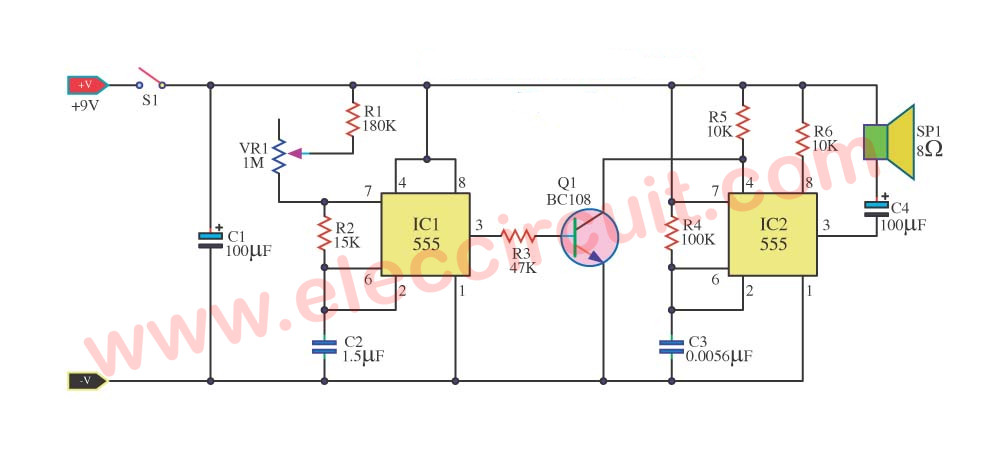
Look at this a 555 metronome circuit. For sound origin Metronome, strange music is good.
First, we use the integrated circuit timer. It is a highly popular number: NE555 or LM555.
In the circuit above, we use 2 IC sections.
The Frequencies are high and low origin alternates. They can give tone sweet sound.
Also, we adjust VR1 to control sound as want.
This circuit required an 8 ohms small-sized loudspeaker. Then, we can buy it in all the common stores, right?
Have fun electronics!
Donkey sound effect project
This is a donkey sound effect project that easy to builds because use simple components include three IC-555 and LM386 and more little parts. Although at present we use Microcontroller IC because small. But some times it is hard to find, so this circuit is suitable for everyone.
How it works
In Figure 1 the schematic diagram of this project.
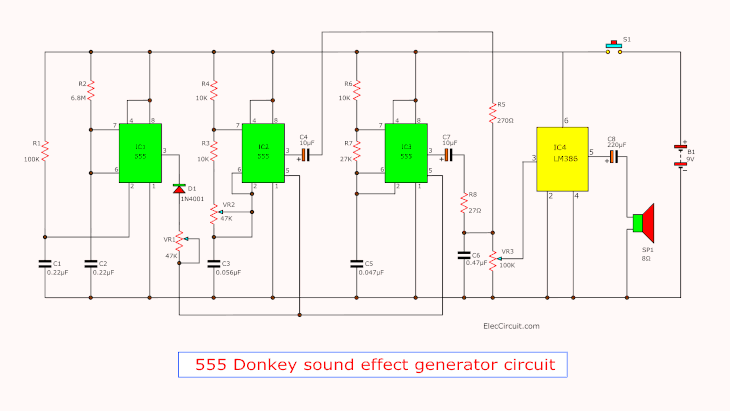
When press switch S1 to apply power to this project. The operation of IC1 will be 2 ranges.
– First, the high voltage is shown at pin 3 until the full time (about 2 seconds), Then switch to the low voltage automatically. This times is controlled by R1, R2 and C1, C2
This high and low voltage from pin 3 of IC1. We will take it to controlled IC2 and IC3 again, by diode D1 and VR1 to pin 5 of both IC. Which D1 act as protect external voltage backward to IC1
While IC2 and IC3 are connected to other parts that controlled it generates the high and low frequency as the voltage from pin 5.
If a high voltage IC will generate high frequency and if low voltage the frequency is low.
Both IC2 and IC3 same work. Because we want realistic sound, Create a two frequency range with a frequency similar to simultaneously make it sound like a chorus.
The IC4 acts amplifier IC2 and IC3 frequency of the speaker, the VR3 as a control signal voltage level before expanding.
Parts you will need
Resistors 0.25W 5%
R1: 100K
R2: 6.8M
R3, R4, R6: 10K
R5: 270 ohms
R7: 27K
R8: 27 ohms
Electrolytic Capacitors
C4,C7: 10uF 16V
C8: 220uF 16V
Mylar capacitors
C1,C2: 0.22uF 50V
C3: 0.056uF 50V
C5: 0.047uF 50V
C6: 0.047uF 50V
Variable Resistors
VR1,VR2: 4.7K
VR3: 100K
Semiconductors
IC1, IC2, IC3: NE555 Timer
IC4: LM386 Amplifiers
SP1- 8 ohms speaker
PCB and more
How to build
First, you need to make a PCB as Figure 2 then assemble all parts on it as Figure 3, next connect more wire and speaker. Next check for error. Then apply power to the circuit.
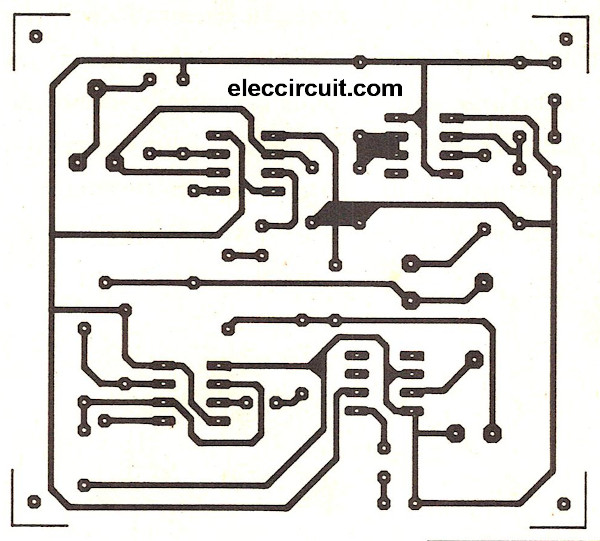
PCB layout

Components layout
Sound effect generator circuit using CD4040
This is a sound effect generator circuit using small electronic components to generate since birds up to siren. With two IC-CMOS are main.
This circuit can many loud sounds in one. It is valuable for very educational, since the counter circuit, to convert digital signals to analog signals. Features of the controlling frequency of Oscillator circuit using two CMOS Gate, All studies have a small budget.
Operation of circuit
To see and understand the work even more as the circuit diagram in Figure 1. A signal from a frequency generator, before is sent to a speaker driver circuit, will be fed back to a 2^8 counter circuit to become as binary signals.
The binary digit set will be send to next step to a converter circuit into a level voltage as the value of that binary signal. And this voltage is used to control the frequency generator again, which it need to increase or reduce frequency as the controlled voltage is higher or lower.

Figure 1 The schematic of the circuit
As working in this way, the result was that the frequency signal of the frequency generator will be high or low at all times. If the signal is high frequencies. The counter circuit will count a lot. The voltage controller of the frequency generator will rise very fast.
The oscillation of sound, it will be fast, such as birds singing loud that “jip..”. In the opposite, if is a low-frequency signal, the oscillation of sound will slow down became the siren go out. After the idea to create the circuit already. Let’s see how to build this circuit to come up with anything better.
From the circuit, We will start at the 2^8 counter circuit before, is CMOS-IC number of CD4040, get frequencies signal into pin 10, then the counting will show as a binary digit on the form of the voltage signal. Which if from 9-volts become to 0-volts actually CD4040 count up to 2^12, but we will use just 2^8 only.
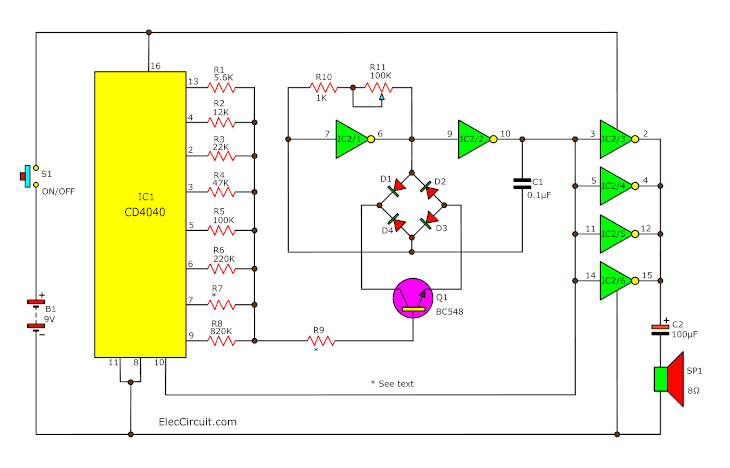
Sound effect circuit using CD4040 CMOS.
Resistors-R1 to R9 are used to change the binary signal that show out of pin 13, 4, 2, 3, 5, 6, 7 and 9 sequence number 8 characters from left to right to single voltage signal. By control current which out of several lead rises as numbers increased.
This current is base current of transistor-Q1, to control amount of current that flow to collector lead to emitter lead next.
IC2/1, IC2/2, R10, R11 and D1 to D4 are combined as the square wave generator circuit, which is controlled frequency by quantity current that can flow through Q1. The frequencies output can change by the current discharge flow through C1.
But since current charge and discharge to C1 on two way only. Which transistor-Q2 only one can not work on two ways. So add diode-D1 to D4 are connected as a bridge to cause current backward through Q1 one way all times.
The rest is IC2 / 3 to IC2 / 6 use as the speaker driver circuit that must to use all four ICs connects to parallel together, since each ICs will can provide low current.
The building and application
Start from making the PCB copper foil track layout(Actual-size) as Figure 3 before, then solder the components as Figure 4. The caution; IC pins, and lead of transistors, electrolytic capacitors carefully before to use. The switch-S1 is normally open pushbutton characteristics on any type. A sized-speaker of 8 ohms, 0.25 watts so reasonable.
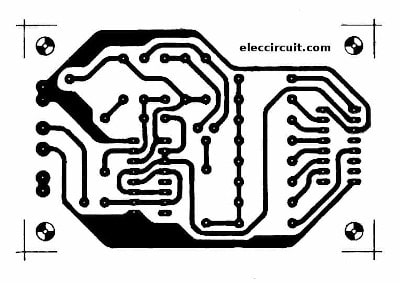
Actual-size,Single-sided PCB layout
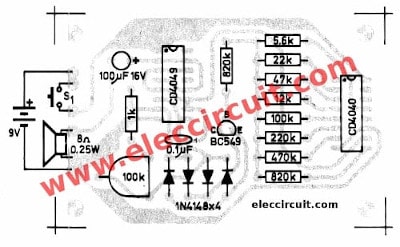
Components layout
The adding resistances-R10 to adjust a using in a proper rage.
But sometimes has some problem is the frequency generators circuit does not work. Because the value of R10 and R11 distorted, cause press switch-S1, then no loud sound and IC2 may be also hot. We must release the Switch-S1 before, then adjust R11 again, and press S1; Try listening again. Until you get the sound you want, if completed, the circuit is installed in the box and connect the power cables completely.
Parts list you will need
C1: 0.1uF 50V, mylar capacitor
C2: 100uF 16V, Electrolytic Capacitors
D1-D4: 1N4148, 75V 150mA Diodes
IC1: CD4040, 12 Stage Binary Ripple Counter DIP-16
IC2: CD4049, Hex Inverter Gate IC
Q1: BC547 or BC549, 45V 0.1A NPN Transistor
0.25W Resistors, tolerance: 5%
R1: 5.6K
R2: 12K
R3: 22K
R4: 47K
R5: 100K
R6: 220K
R7: 470K
R8, R9: 820K
R10: 1K
R11: 100K, Potentiometer,horseshoe-shaped resistor
S1: Switch of normally open pushbutton
and others
9-volts battery and Snap connector
SP1: The loudspeaker of 8 ohms, 0.25 watts.
Chicken sound effects circuit
This is a Chicken sound effects circuit. I buy it from the electronic shop for my son as his first project. It uses various sound from chips IC is a type of sound generator circuit.
Which use principle digital memory is a digital signal and program into ICs. All this movement be made from the IC manufacturer. We will not change these programs. This manner that we called as ROM.
And for our circuit, ROM-IC can be done in a microchip and sealed with the PCB board.
Technical information.
- Use the power supply of 3 V.
- The maximum current consumption: 75mA at 3V.
- PCB dimensions. 1.21×1.77 inch.
How does it work
In this circuit, all various working will be in IC completely. By output pin 5 of IC will connect into pin B of TR1. By through R3 to amplify output a speaker. Pin 2 of IC will be connected through R2 derive the positive voltage, to determine the frequency, and pin 3 will be trigger pin the output signal out of pin 5 will send back to pin b of TR2. Which serves as help in the trig at pin 3 to circuit working all time. When has a jumper at J2. This circuit uses a power supply of 3V but if want to use a power amplifier and use voltage 12V will use a jumper at J1 as Figure 3.
Figure 1 the chicken voice sound generator circuit
How to assemble circuits
Patterns positioning device shown in Figure 2. In the assembly circuit,Starting equipment lowest first to Beautiful and easy to the assembly. Start from Diode and then resistors and sort of high continuously.
Figure 2 The components layout of Chichen sound generator circuit.
The device has various polarity should be careful in the assembly circuit. Before placing these components will set the polarity at PCB and the part match together because If you put backward, may cause equipment or circuit damage. How to check polarity and input device.
The soldering iron is less than 40watts. And Use of lead solder containing lead and tin in the ratio of 60/40. Including the need also to have a flux inside the lead.
Then after that put the components and completely solder. to check correctness again But if you enter the wrong position. Should use a desoldering pump or a Desoldering remover To prevent damage to the PCB.
For audio ICs for soldering with pin- IDE for bent before. Then plug on PCB.
Caution: This circuit uses an IC chip is important circuit. So be careful while soldering without heat buildup on the circuit too much. And the IC should not be twisted.
Testing
Connect the power supply 3V to the circuit (no jumper J1). and then press switch-S1 We will hear out of speaker The end of one cycle and then stops. To repeat sequences, and so on for the J2 jumper together. This circuit is not very loud. But if the box is for noise increase.
You can listen to the sound chickens from this video.
Also see:
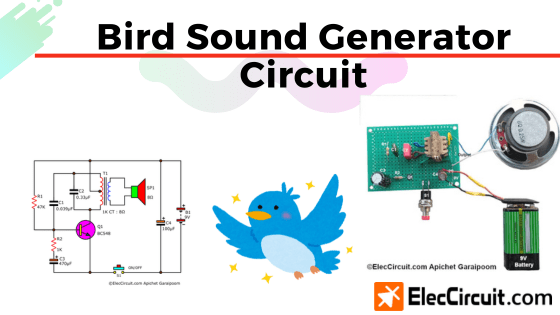
Bird Sound Generator circuit: It is effortless.
GET UPDATE VIA EMAIL
I always try to make Electronics Learning Easy.
Related Posts

I love electronics. I have been learning about them through creating simple electronic circuits or small projects. And now I am also having my children do the same. Nevertheless, I hope you found the experiences we shared on this site useful and fulfilling.




i need sound card ta accept separate signals “waves” and display them separate on computer monitor. I am using Mixpad software
Hi, the “chicken-voice-sound-generator-circuit” is missing, please upload it.
por fzvor ponga el diagrama del sonido de pollo
Hello,
Please read here: https://www.eleccircuit.com/bird-sound-generator-circuit/
It is similar to that circuit. Thanks