Do you like listening to music from personal headphones? Here is how you can make it better. Let’s builds the class A headphone amplifier circuit that is very good quality sound.
It consists of a low noise Op-Amp IC and two transistors as main. So there are very cheap and easy to build.

Also, It can increase all audio sources such as CD players, AM-FM radios, and others.
Many people like this simple transistor headphone amplifier.
Read Also: Simple transistor headphone amplifier circuit
It has a good sound. Because of using pure transistors. But sometimes you may like this project because it is the modern circuit.
Why should we make this?
Many people like this simple transistor headphone amplifier circuit.
Many audio experts have said that Class A sound systems have the best sound. No distortion. In other systems, Class AB or B or even Class D lose it. So, the designer sets this circuit into class A.
And it is an OCL amplifier, too. Therefore, able to respond to the sound better than the old circuit. That is the Class AB and OTL Amplifier circuit.
Which one do you choose?
How does it work
Okay dear friends you choose smart.
Let’s see the complete circuit below.
the circuit diagram
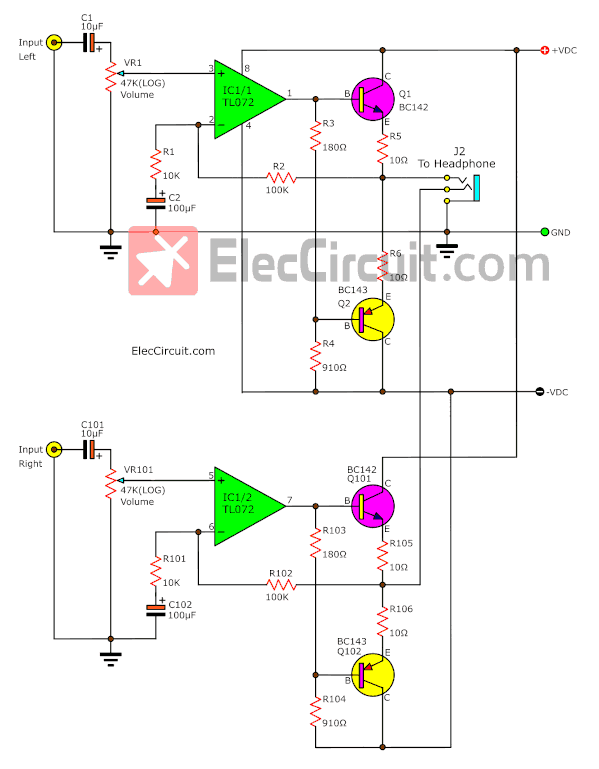
Figure 1 is a complete Class A headphone amplifier circuit. By showing both the Left-Right channels.
For the parts lists on the right channel will start with the number 10. For example, R101, Q101, C101, etc.
First, the audio signal comes to the input through J1 and C1. The C1 is a coupling capacitor to block DC voltage away.
Then, the audio signal is adjusted volume by VR1. So it causes an input impedance equal to VR1 is about 47K.
The IC1 is TL072 op-amp acts as the low noise signal amplifier. Which we set form circuit to become the non-inverting circuit.
The signal out of IC1 at pin 1. Both resistors R3 and R4 are set in the class A mode, to be the bias current to the base of transistors Q1, Q2.
Both resistors R5, R6 are the heart of this class A designing. As they set the feedback signal to the output section to be more stable better.
Recommended: Low voltage preamplifier circuit with tone control
The feedback signal from the output will turn through resistor-R2 into the inverting pin of IC1.
The gain of IC1 is determined by R1 and R2, with a value of about 11 times.
See a power supply
From the complete circuit. We add the Dual power supply circuit. T1 is a transformer to reduces AC line voltage 117V or 230V to 6V (6V-CT-6V) to diode BD1 Bridge Diode.
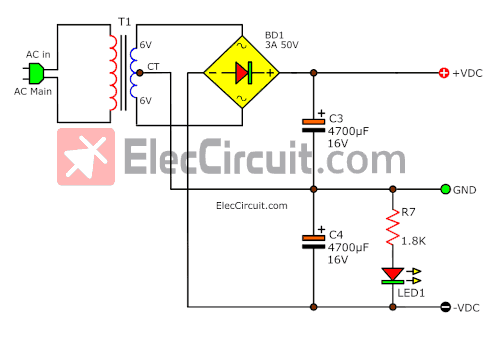
It is a dual power supply that there are capacitors C3 as a positive filter and C4 for negative. And LED1 is power on a display of circuit.
Note: as the principle of unregulated power supply. If we use 1A transformer we should use the filter capacitor more than 2,000uF for clean ripple voltage. It will cause more than a ham noise on your sound system. In this circuit we use 4,700uF it is better cleaner.
Or you can use both 6V batteries for sure.
How to build
We can assemble this circuit on a perforated board.
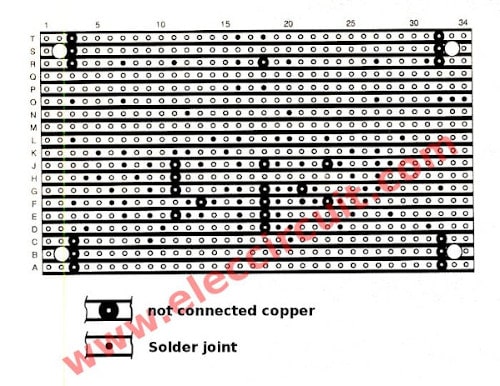
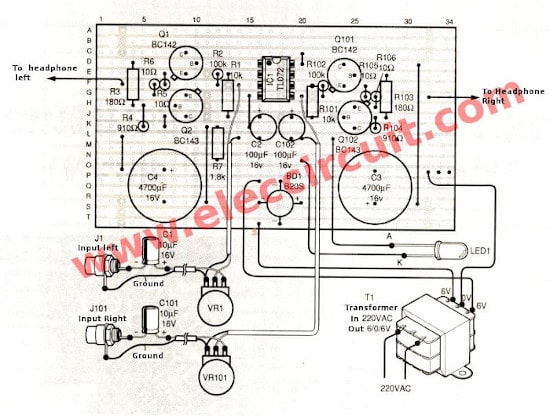
You need to assemble carefully the priority to the positive-negative of electrolytic capacitors and diodes and transistors.
See guidelines for examples of equipment assembly below.
Application
This Headset amplifier with power wattage to about 120 mW for headphone 8-32 ohms. It is a common size.
This circuit has a frequency response of 2.5Hz to 100 kHz. Is it good?
Test and test
You can take the signals from the line-out of the tape player, tuners, and more. To enter into the input of the circuit. Then, the well sound out of the headphones.
Recommendation: This project should be assembled onto steel or aluminum boxes to prevent noise.
Have fun of music
The parts lists
Resistors ¼ W +-5%
R1, R101: 10K
R2, R102: 100K
R3, R103: 180 ohms
R4, R104: 910 ohms
R5, R105, R6, R106: 10 ohms
R7: 1.8K
Potentiometers
VR1, VR101: 47K(LOG)
Capacitors Electrolytic
C1, C101: 10uF 16V
C2, C102: 100uF 25V
C3, C4: 4,700uF 16V
Semiconductors
LED1: LED Red 5 mm.
Q1, Q101: BC142
Q2, Q102: BC143
IC1: TL072 Dual Low-Noise JFET-Input General-Purpose Operational Amplifier.
BD1: 3A 100V Diode Bridge
Others Parts.
J1, J101: RCA Jack.
J2, J102: Stereo Headphone Jack
T1: transformer In 220V Out 6V-0V-6V 1A
Not only that you may like these circuits
- Simple Electronic Stethoscope circuits
- The cheap & small hearing aids circuit project
- Class A amplifier circuits (simple ideas)
GET UPDATE VIA EMAIL
I always try to make Electronics Learning Easy.
Related Posts

I love electronics. I have been learning about them through creating simple electronic circuits or small projects. And now I am also having my children do the same. Nevertheless, I hope you found the experiences we shared on this site useful and fulfilling.


hello,
schematic is very poor.
can’t read component values from the picture.
please resend article with large and good writing of the values
Hi,ami rosenberg
Thanks for your feedback.
I am sorry no good image.
but you can assemble them on perferated board.
Hi, the please replay about right side circuit connection
Hello Anbarasan,
Thank you to visit my site. I am sorry for an image. Please assemble them on the perforated board.